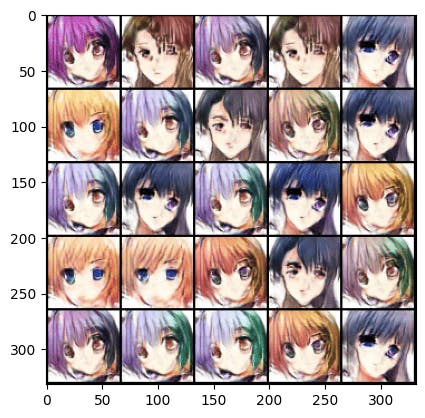
This article will teach you how to use GANs and PyTorch to create your own anime faces. GANs are a type of deep learning technique that can be used to generate new data. PyTorch is a deep learning framework that makes it easy to use GANs.
This article is perfect for anyone who is interested in learning how to create anime faces. It is also a great resource for anyone who is looking for a new project to add to their portfolio.
The only way to learn is by doing. – Albert Einstein
Who not for this airtcle ❌
- Someone searching to learn in-depth, What GANs ( Generative Adversarial Networks ) or deep learning framework PyTorch, this is not the correct article for you.
Which thing need for this article ✅
GPU ( Personally free GPU available in Google Colab but it takes lots of time to train the model ) 🤖
Curious about learning new things, and enjoy writing long lines of code.
Know how to use LLMs ( large language models) like ChatGPT Or Google Bard, because it’s helpful tool learning.
Some knowledge ( Matplotlib, NumPy ) is helpful understand some lines of code.
Note ✨ — Make sure you are using ‘GPU’ not ‘CPU’, which means you don’t need to buy any huge price of ‘GPU’ just use ‘Google Colab’ free ‘GPU’, or if you already purchase that is fine. In this article, I am using the ‘Colab’ notebook because it’s easy to use.
Run ✨this one line of code in the Colab notebook and see which ‘GPU’ you use.
# Can I use GPU
!nvidia-smi -L

# Output >>> GPU 0: Tesla T4 (UUID: GPU-1ac8a2c1-c455-3af0-9928-1ba3bf01e4a4)
If your output is not the same as you see here, that means you do not use ‘GPU’ so follow this step and change your runtime in ‘GPU’ in colab
$$[ i ] C l i c k r u n t i m e \ [ i i ] C l i c k \ C h a n g e \ R u n t i m e \ T y p e – \ G P U$$

Keep reading!✨
Import All Library And Download Dataset
In this section, I import all the library needed to complete this project, then the next step is to download the dataset. If you find any problem in this article, don’t waste your time just ask me a question on Twitter. 🦜
# Import some of the main Library for using this notebook.
import torch
import numpy as np
from torch import nn
from tqdm.auto import tqdm
from torchvision import transforms
from torchvision import datasets
from torchvision.utils import make_grid
from torch.utils.data import DataLoader
import os
from PIL import Image
import matplotlib.pyplot as plt


torch.manual_seed(0) # Set for our testing purposes, please do not change!

# These are some of the hyperparameter values I used later.
z_dim = 10 # It's used to dimension the noise vector
display_step =  500 # It's used for how many times to train before visualizing model generate image and actual image.
batch_size = 128 # It's specified to batch size
lr = 0.0001 # This value specified to learning rate of the model optimizer.
beta_1 = 0.5
beta_2 = 0.999
device = "cuda" if torch.cuda.is_available() else "cpu" # I connect GPU than return cuda If not than return cpu
# Create One dataset folder to store my actual unzipped dataset file
!mkdir "dataset"
Now it’s time to download the dataset and unzip the file. 🤐
Follow this step-by-step process download the dataset Kaggle and unzip it!
1 Go to this dataset page for provide by Kaggle.
See the above right corner to show a black color button with text (Download).
Click this download button and choose where to save this file. 💾
Now data download is complete, it’s time to know a little bit about what the dataset is about!
Dataset Info — This dataset contains 63k high-quality anime character images. The cool thing about this dataset every image is different ( H, W ).
$$D⊂R^{H×W×C}$$
# Unzip the dataset file and move on to the dataset folder
# Make sure you replace my file path with your file path to store the actual dataset.

!unzip /content/drive/MyDrive/Dataset/GAN-DataSet/cartoon.zip -d "dataset"
I hope you unzip the dataset, if you find any problem don’t waste your time just asked me ⁉️. Now my next job is to do some preprocessing of our data so I can use this data training model.
Data Preprocessing And Visualize Data
In this section, I create one 🐍class ( ImageFolderDataset ), this class takes the directory of the file path ( … \ … ) and transform it into a PyTorch dataset (I need a training model ).
Resize all images to ( 64, 64, 3) Pixels.
Center crop using for all images.
Convert all images to PyTorch Tensor.
Normalize all images.
Let’s write a custom dataset class ( ) to load my data into the file manager and do some of the preprocessing techniques. After load data into PyTorch DataLoader because it’s required when training my model. After all, things are done, the next job is to create a visualize function ( ), that I use to display images.
# Custom Dataset Class
class ImageFolderDataset(torch.utils.data.Dataset):
    """
    It takes the actual dataset directory path and transforms it.
    `root_dir:` It's the actual dataset directory path except.
    `transform :` It's except transformation in PyTorch

    Return - It's returned as a Pytorch dataset.
    """
    def __init__(self, root_dir, transform=None):
        self.root_dir = root_dir
        self.image_filenames = os.listdir(root_dir)
        self.transform = transform

    def __getitem__(self, index):
        image_filename = self.image_filenames[index]
        image_path = os.path.join(self.root_dir, image_filename)
        image = Image.open(image_path)

        if self.transform:
            image = self.transform(image)

        return image

    def __len__(self):
        return len(self.image_filenames)
# My transformation looks like this
transform = transforms.Compose([
    transforms.Resize((64, 64)),  # Resize the image to 64x64 pixels
    transforms.CenterCrop(64),
    transforms.ToTensor(),         # Convert the image to a PyTorch tensor
    transforms.Normalize((0.5, 0.5, 0.5), (0.5, 0.5, 0.5)),

])

# Now called custom dataset classes
train_dataset = ImageFolderDataset("/content/dataset/images",transform)
# Now time to pass through custom dataset into DataLoader in Pytorch
dataloader = DataLoader(
    train_dataset, # It's the actual custom dataset
    batch_size=batch_size, # Split out the whole dataset into batches
    shuffle=True, # If it's true mean the randomly order of samples in each batch
    drop_last=True # I drop it last incomplete batch of data.
    )
# Once the data loading part is complete then move on to
# create one helpful function to display a batch of images or a single image.
def show_tensor_images(image_tensor, num_images=25):
    '''
    This Function for visualizing images: Given a tensor of images and a number of images
    plots and prints the images in a uniform grid.
    '''
    image_tensor = (image_tensor + 1) / 2
    image_unflat = image_tensor.detach().cpu()
    image_grid = make_grid(image_unflat[:num_images], nrow=5)
    plt.imshow(image_grid.permute(1, 2, 0).squeeze())
    plt.show()
Now my visualize function show_tensor_images( ) is ready it’s time to use this function and see what our data look like. But here is one question for you, notice down below I used for loop the question is, why I used to answer the comment below? When you give me an answer that means, you are really actively learning.
sample = None
for d in dataloader:
  sample = d
  break

show_tensor_images(sample)
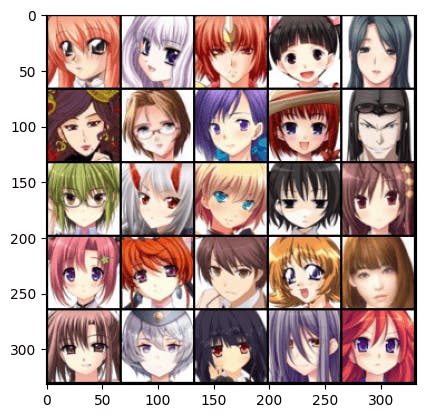
It’s nice,🤣
Build Generator and Discriminator Model
$$Generator: z ~ p(z)x_g = G(z) Discriminator: x ~ p(x) or x_g ~ G(z)y = D(x)$$
First, understand what is do each of these models means ❓
$$Generator: z ~ p(z) x_g = G(z)$$
This model is input as noise and turns into data that look real.
$$Discriminator: x ~ p(x) or x_g ~ G(z) y = D(x)$$
This model is input as a generated sample or real sample to predict whether is real or fake.
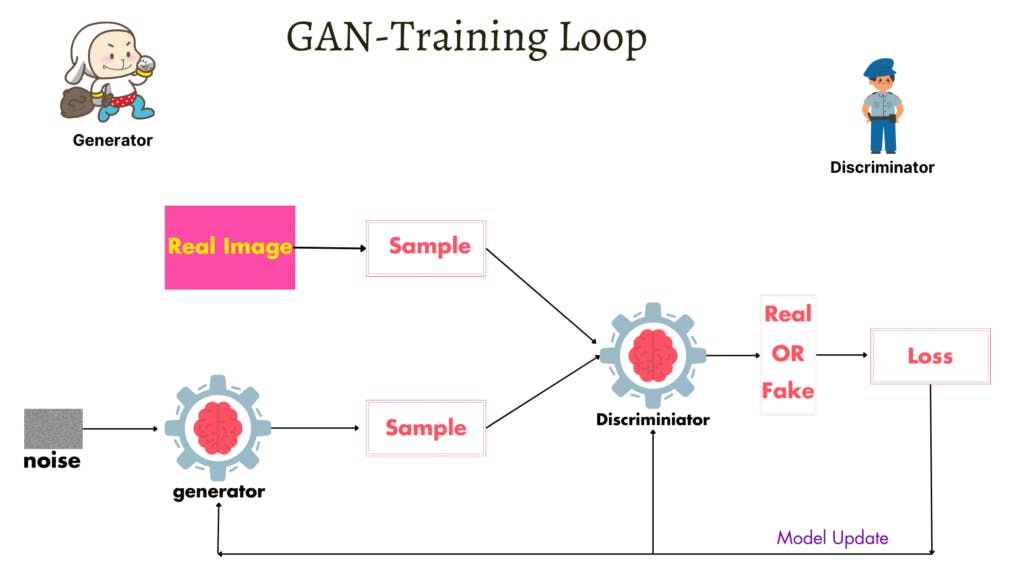
You can think, these two-model is like a thief 🎭 and police 👮🏻♂️. Why I say this because thief Generator try to best work for fool the police and police Discriminator try to best for predicting what is real and fake.
I hope you understand how these two neural network work ( Generator, Discriminator ), now it’s time to write PyTorch code ( … /… ) !
Keep coding! 💥
class Generator(nn.Module):
    '''
    Generator Class
    Values:
        z_dim: This is dimension of noise vector.
        im_chan: the number of channels of the output image, a scalar
              (Anime dataset is rgb, so 3 is your default)
        hidden_dim: It's a scaler value to specify number of hidden unit.
    '''
    def __init__(self, z_dim=10, im_chan=3, hidden_dim=64):
        super(Generator, self).__init__()
        self.z_dim = z_dim
        # Build the neural network
        self.gen = nn.Sequential(
            self.make_gen_block(z_dim, hidden_dim * 8),
            self.make_gen_block(hidden_dim * 8, hidden_dim * 4),
            self.make_gen_block(hidden_dim * 4, hidden_dim * 2),
            self.make_gen_block(hidden_dim * 2, hidden_dim),
            self.make_gen_block(hidden_dim, im_chan, kernel_size=4, final_layer=True),
        )

        self.layers_st = []

    # Create one usefull method for oneline to complete squence of layer add
    def make_gen_block(self, input_channels, output_channels, kernel_size=3, stride=2, final_layer=False):
        '''
        Function to return a sequence of operations corresponding to a generator block of DCGAN;
        a transposed convolution, a batchnorm (except in the final layer), and an activation.
        Parameters:
            input_channels: how many channels the input feature representation has
            output_channels: how many channels the output feature representation should have
            kernel_size: the size of each convolutional filter, equivalent to (kernel_size, kernel_size)
            stride: It's stride of the convolution
            final_layer: a boolean, true if it is the final layer and false otherwise
                      (add Tanh activation and not added batchnorm)
        '''
        if not final_layer:
            return nn.Sequential(
                nn.ConvTranspose2d(input_channels, output_channels, kernel_size, stride),
                nn.BatchNorm2d(output_channels),
                nn.ReLU(inplace=True),
            )
        else:
            return nn.Sequential(
                nn.ConvTranspose2d(input_channels, output_channels, kernel_size, stride),
                nn.Tanh(),
            )

    def forward(self, noise):
        '''
        Function is completing a forward pass input noise into generator and return genrated image.
        Parameters:
            noise: a noise tensor with dimensions (n_samples, z_dim)
        '''

        x = noise.view(len(noise), self.z_dim, 1, 1)
        return self.gen(x)

    def layers(self):
      """
      It's one usefull function for get all layer in generator class.
      """
      for i,layer in enumerate(self.gen):
        for l in self.gen[i]:
           self.layers_st.append(l)
      return self.layers_st


def get_noise(n_samples, z_dim, device='cpu'):
    '''
    Function for creating noise vectors: Given the dimensions (n_samples, z_dim)
    creates a tensor of that shape filled with random numbers from the normal distribution.
    Parameters:
        n_samples: It's scaler value to specify number of sample generate.
        z_dim: It's also scaler value to specify dimension of noise vector
        device: It's device type which you using it.

        returns ~ This function returns as a noise vector.
    '''
    return torch.randn(n_samples, z_dim, device=device)
Now Generator class ( ) is ready, now it’s time to move on and create the Discriminator class ( )
class Discriminator(nn.Module):
  def __init__(self,im_chan=3, hidden_dim=64):
    super(Discriminator,self).__init__()

    # Sequence of layer add
    self.disc = nn.Sequential(
        nn.Conv2d(im_chan,hidden_dim,kernel_size=4,stride=2,padding=1),
        nn.LeakyReLU(0.2,inplace=True),
        self.get_disc_group_of_layer(hidden_dim,hidden_dim*2,kernel_size=(4,4),strides=2),
        self.get_disc_group_of_layer(hidden_dim*2,hidden_dim*4,kernel_size=(4,4),strides=2),
        self.get_disc_group_of_layer(hidden_dim*4,hidden_dim*8,kernel_size=(4,4),strides=2),
        self.get_disc_group_of_layer(hidden_dim*8,1,kernel_size=(4,4),strides=1,final_layer=True),
    )

  # This is one useful function to help you to get a sequence of layers add just write oneline.
  def get_disc_group_of_layer(self,input_channels,output_channels,kernel_size=4,strides=1,final_layer=False):

    if not final_layer:
      return nn.Sequential(
          nn.Conv2d(input_channels,output_channels,kernel_size,strides,padding=(1,1)),
          nn.BatchNorm2d(output_channels),
          nn.LeakyReLU(0.2,inplace=True)
      )
    else:
      return nn.Sequential(
          nn.Conv2d(input_channels,output_channels,kernel_size,strides,padding=0),
          nn.Sigmoid()

      )


  def forward(self,x):

    """
    This method to completing forward pass generate an image or real image into discriminator model
    and return as a 0 (fake) or 1 (Real).
    """
    disc_pred = self.disc(x)

    return disc_pred
Train Generator and Discriminator
This is a cool section because I train model !😎
The below image example shows how to update two model parameters.
# Generator Model or object create set to device
gen = Generator().to(device)
# Adam optimizer using and set some of the parameters to help model learn good way.
gen_opt = torch.optim.Adam(gen.parameters(),lr=lr,betas=(beta_1, beta_2))
# Same as above but this time Discriminatior model create or object
disc = Discriminator().to(device)
# Same this time Adam optimizer using and set some of the parameters to help model learn good way.
disc_opt = torch.optim.Adam(disc.parameters(),lr=lr,betas=(beta_1, beta_2))

def weights_init(m):
    """
    This down-below function works for initializing the weight of the convolution layer and Batch normalization
    layer in PyTorch.
    follow the step this function:
     1. first take the PyTorch module as `m` input and check if it's insentece of
        Conv2d() layer or ConvTranspose2d() layer or BatchNorm2d() layer class.
     2. If Conv2d() or ConvTranspose2d() is match then initialize weight with random number
        draw form a normal distribution with mean is 0.0 and standard deviation 0.02 set.
     3. If BatchNorm2d() is match then initialize weight same as 2 number point. in this time
        also set layer bias to using zero.
    """
    if isinstance(m, nn.Conv2d) or isinstance(m, nn.ConvTranspose2d):
        torch.nn.init.normal_(m.weight, 0.0, 0.02)
    if isinstance(m, nn.BatchNorm2d):
        torch.nn.init.normal_(m.weight, 0.0, 0.02)
        torch.nn.init.constant_(m.bias, 0)

# Apply the weights init function to initalize layer weight.
gen = gen.apply(weights_init)
disc = disc.apply(weights_init)
Main Training Loop For Learn GAN
Understand one line at a time 👇
nn.BCELoss( )— This is binary cross-entropy for use when you work with two classes. In my case, only two classes have one is real and another is fake.n_epochs— it’s to specify how many times to model train the entire dataset.gen.train( ) or disc.train( )— It specifies a model training model or model say I am ready to learn..to(device)— It’s used to move the tensor data specified device. Which enables computation for the corresponding device..full( )— It’s used to create label-specific batch sizes. 1 is a real label and 0 is a fake label also set the device parameter.
First Discriminator Train With Real Example💥
disc(actual_image)— It’s predicted on a real example and the return value flatten out.criterion(real_pred, label)— It’s calculated by the loss between the predicted label and the real label..backward( )— It’s used for backpropagation algorithms when training the model. It computes the gradient loss with respect to model parameters.
Second Discriminator Train With Fake Example 💥
get_noise( )— get the noise valuegen( )— take noise sample to generate a fake image..fill(0)— actual label set to 0 means fake.disc( )— It’s input as a fake example and returns predicted labelcriterion(fake_pred, label)— Calculate loss between fake image prediction and real label.
Third Generator Model Train💥
It’s used for all model parameters set to 0 value.
Actual label value set 1.
Input generates image into discriminator model.
Calculate the loss between discriminator prediction and the actual label.
Update the weight W base for loss calculation.
If the model training part is complete🎯 then move on to visualize fake and real examples when the model is trained. Also, that time ⏱️ save the model 🤖.
criterion = nn.BCELoss()
n_epochs = 100
for epoch in range(n_epochs):
  for i, data in enumerate(dataloader):
    gen.train()
    disc.train()
    # Upgrade Discriminator Weights
    disc.zero_grad()
    actual_image = data.to(device)
    b_size = actual_image.size(0)
    label = torch.full((b_size,),1. ,dtype=torch.float,device=device )
    real_pred = disc(actual_image).view(-1)
    real_loss = criterion(real_pred, label)
    real_loss.backward()

    noise = get_noise(b_size,z_dim,device)
    fake_image = gen(noise)
    label.fill_(0.)
    fake_pred = disc(fake_image.detach()).view(-1)
    fake_loss = criterion(fake_pred,label)
    fake_loss.backward()

    disc_loss = real_loss + fake_loss
    disc_opt.step()

    # Upgrade Generative Advairicial neural network
    gen.zero_grad()
    label.fill_(1.)
    fake_disc = disc(fake_image).view(-1)
    fake_gen_loss = criterion(fake_disc,label)
    fake_gen_loss.backward()
    gen_opt.step()
    if i% display_step == 0:
      print(f"step: {i}, epoch: {epoch}, Disc Loss: {disc_loss.item()}, Gen Loss: {fake_gen_loss.item()}")
      output = gen(noise).detach()
      # save model
      torch.save(obj=gen.state_dict(),f="cartoon_gan.pth")
      torch.save(obj=disc.state_dict(),f="cartoon_detect.pth")
      show_tensor_images(output)
      show_tensor_images(actual_image)
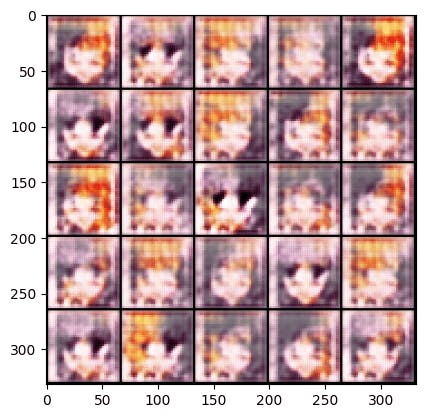
You can see the output of our model! It’s amazing, every epoch our model gets better and better! 👇
Epoch 1 :
Epoch 10 :
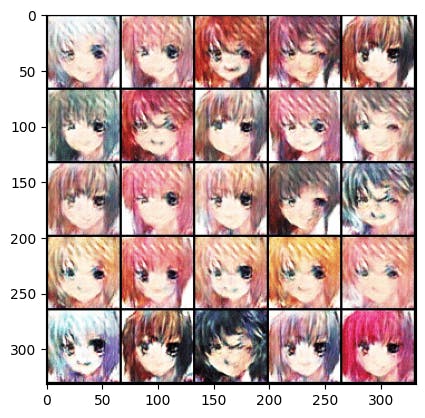
Epoch 30 :
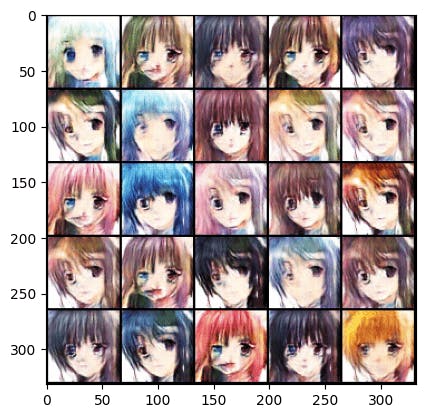
Epoch 70 :
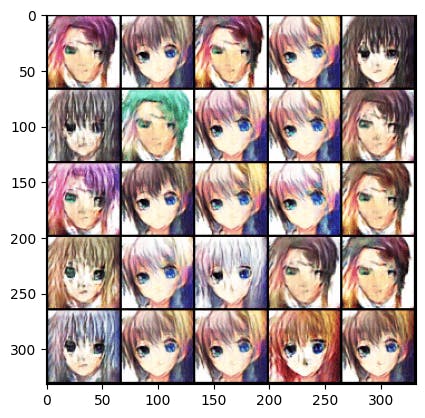
Epoch 116 :
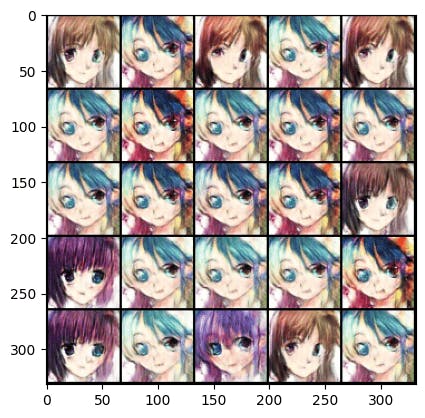
Running on 357 :
